How To Observe Mushrooms Methodically
Tips for a truly compendious mushroom observation! If you follow these 7 steps, an expert can likely speculate on your mushroom.
For basic documentation, find a great guide here and even a stellar video: Tips for Observing Fungi for iNaturalist. Review those first!
Getting an excellent field identity comes down to seven points. Many of my observations lack these, but they're always a goal.
1. Take Multiple Shots
Aim for a minimum of four photos. Clear, deliberate photos are more valuable than many casual, blurry ones.
Intro: In Situ View

First, photograph the mushroom as you noticed it, gently clearing away any leaf litter or debris. Include the overall surroundings and habitat. If keeping your location obscured, remember to crop any iconic trail sign or bridge in the background. Tip: to stabilize your smartphone, use your body as a tripod - hold the phone with both hands, touching your left thumb to your chin.
The steps are exemplified here by alan_rockefeller with Suillus americanus.
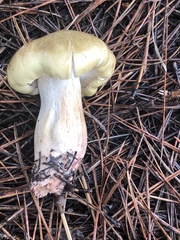
Prelude: Stipe View

Fully excavate the mushroom. For Phaeocollybia this may take an hour, so choose your battles! Dust off any dirt from the stipe base, but without removing any floccules or basal mycelium. Now photograph the stipe base.
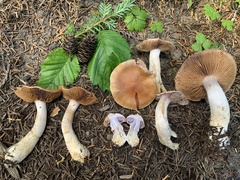
Main Act: Profile View

Lay the mushroom on the soil and photograph it from stem base to cap, aiming for a gestalt or "mugshot". If the mushroom is solitary, this can be the family portrait for your observation.
Act Two: Lamellae View

Next, take a close up of the tubes, gills, teeth or gleba (fertile surface). For smartphones, you may need to focus manually here, by long-pressing the focal point.
- Put your hand behind the mushroom to aid the focus
- Move the phone farther away and crop later
- Use your loupe or macro lens attachment to reduce focal length
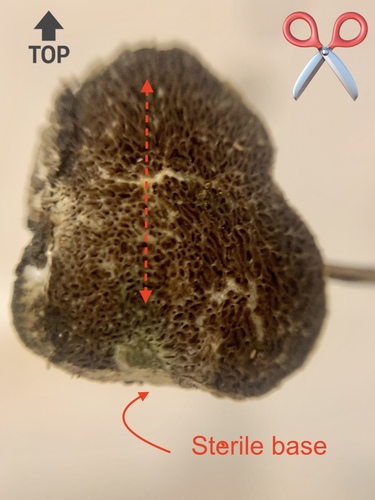
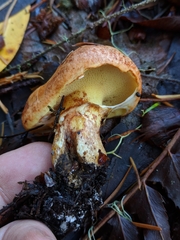
Conclusion: Bisection View
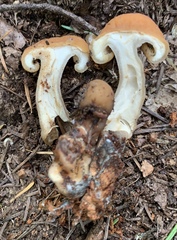
Now, cut the mushroom in half lengthwise, along the vertical axis. For non-stemmed mushrooms like truffles, align the fruiting body in the same vertical orientation you found it. Otherwise certain details like columellae will be lost. Here's an example showing a sterile pedicel, visible only after careful axial cross-section:
If you find multiple fruiting bodies, choose the youngest to bisect and include this in your family portrait.
This bisection helps capture oxidization reactions for Boletales, Agaricus, and Corts among others. It also reveals hollow or stuffed stems, important for Tricholoma, Suillus and some Ascos for example.
2. Preparing a Family Portrait

Your previous profile photo #3 can be the main photo for your observation, showing salient macrofeatures at a glance, similar to those in books like Mushrooms of the Redwood Coast. If you find multiple fruiting bodies, gather them into this photo, along with your bisection. Include one mature and two young specimens, showing the range of size.
For solitary mushrooms, consider compositing a single fruiting body at multiple angles into the same photo (tripod helps). If saving your specimens, include a paper label in the photo to save headaches later.
How distantly should you search for fruiting bodies? Tough question - in theory every iNat observation is of a "single subject", not merely a single species. Most of us interpret "subject" as the underlying genet rather than the mushrooms themselves. So if new, you can likely assume a clump of similar mushrooms are of the same genet, and worth including. Use your best judgement. Veteran observers may gather more distant sporocarps into the same family portrait, even though similarly combining subjects could meet some protest in an animal observation.
3. Photograph in the Field Only
Photography in the field is always preferable to a faded fungus exhumed from the fridge. If cones, needle bundles, or large tree leaves are present around the mushrooms, gather those and place them in your family portrait. If using a smartphone, another bonus is your observation is automatically geotagged.
4. Document Non-Visuals
Aroma, taste and textures can be evanescent - document these when picking the mushroom. For taste, chew for 10-30 seconds and spit out the flesh. Refrain if you suspect a mushroom is poisonous.
Rub the mushroom before smelling, or smell your bisection sample. If a companion is nearby, get an olfactory second opinion.
If obscuring location, document the aspect of the site, especially helpful to figure out if your taxon is vernal or aestival. Just observe roughly which cardinal direction your site slopes down to (N, S, E, W). Spring mushrooms may fruit on north slopes about the same time summer ones fruit on the south, so worth recording.
Of course, include local tree types and any understory shrubs you recognize. If your mushroom seems linked to other mushrooms, mycoheterotrophs or insects, capture that.
5. Include the Whole Stipe
Above, we advised cleaning any stipe and pseudorhiza ("stem") with a foam paintbrush and taking an inverted photo. This interface to the mycelium often has special pigments varying between species, but is easily missed. For example, in the bland Tricholoma saponaceum clade, this region will show a splash of pinkness.
Comment: this stem base photo aspect is important but often overlooked! Many naturalists have foraging backgrounds and cut off the base when harvesting, or to avoid fouling their basket. If brushing away dirt is too laborious, a dirty shot can still be helpful.
6. Apply Basic Tests
Substrate
Take note of the growing medium. Often a seemingly terrestrial mushroom is actually growing on buried wood, so probe around. Tips on guessing the original tree type from a long-dead log:
- Conifer logs are usually very round in profile
- Hardwood logs are often irregular and curvilinear, like a human arm
- Hardwood logs stay intact for much longer
- Shaggy bark trends to conifer
Consider just photographing the entire log and figuring it out later!
For terrestrial mushrooms, scoop up a pinch of soil and characterize it as best you can - rich, sandy, chalky, clay, loam, duff. Many of the more cryptic genera can be distinguished somewhat by their soil preferences - for example, Calonarius may favor impoverished, chalky soils (calciphilous). One test here is to drizzle a weak acid like white vinegar and check for fizzling.
Lye Reaction
Many species are distinguished based on color changes to a caustic agent, traditionally lye (aqueous 10% KOH or NaOH). This is simple and cheap to procure, so just get it or ask to borrow some at your local mycology club. In theory, household drain cleaners have the same effect, but any discrepancy makes your test less useful.
I routinely just drizzle lye on the context after taking the bisection photo. If a reaction ensues, I take the photo again, this time with an eyedropper next to the lye stain to remember.
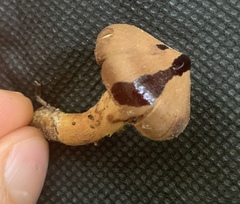
Be generous with your lye - drizzle on the cap surface, base, inner context (flesh) and mycelial roots. For example, KOH reacts differently on the context vs cap of this cort, suggesting Phlegmacium variosimile.
Blushing
Rub and scratch the very base of the stipe and note any color change. Repeat this for the cap and inner flesh of your bisection sample. If positive, repeat photos.
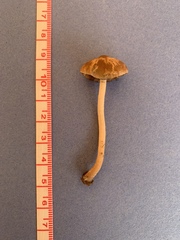
7. Measure It
Surprisingly, many species are only distinguished in the field based on a slightly different range of cap or stem sizes. So, repeat your profile photo, this time with a measurement device.
I prefer a soft sewing tape measure reel. A light plastic ruler is also popular, or get fancy with a graduated trowel. In a pinch, many use a coin. Metric is preferable.
Optional: Advanced Tests
These are only occasionally helpful, but still fun to do.
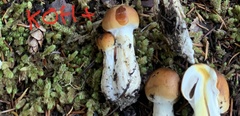
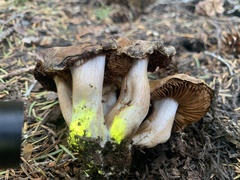
Blacklight
Shine a UV 365nm light at the gills from underneath. You'll need to block out ambient light, so drape your specimen with a drop cloth. Alternatively, this works well at night or back at home.
Fluorescence reveals the quantity of certain compounds in the mushroom flesh, for example helping isolate vernal Cortinarii to sect. Leprocybe, or the telamonioid C. ahsii as shown.
Remember this is fluorescence (via fungal fluorophores). Bioluminescence, in contrast, is produced more by animals or algae rather than fungi, with rare exceptions mostly in Mycena. *Be skeptical of bioluminescence claims outside primary literature: anything becomes luminescent with enough squinting, imagination and photo editing!
Iron Salts
Take some old iron pills and crush them up in an aqueous solution, drizzle this on the bisection sample, just like your KOH. Do this after the KOH. Swimming pool owners may also give you a sample of their ferrous sulfate cleaner (FeSO4) or order online.
Ammonia
Ammonia is easy to procure and can make your specimen ID more conclusive. An old covid test tube can work nicely for storing the reagent in your field kit.
Iodine
Some species groups can be distinguished by iodine reactions, traditionally with Melzers or Lugol's iodine (I2KI 2%). While the former is usually too scarce to drizzle around in the field, Lugol's is easy to obtain and worth carrying. These reactions are often slower, so keep checking on them.
Don't Do This!
Never wash your mushroom
If dirty, clean with a foam paintbrush.
Never photograph with indoor lighting
If you can't photograph in the field, then do it indoors during the day, next to a window with natural light.
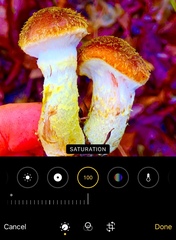
Don't edit colors.
Bumping saturation on your photo is tempting since colorful or glowing mushrooms are so eye-catching. This is typical for pro mushroom photographers, but less accurate for science. If you want to oversaturate the mushroom, distribute that separately from your iNat observation. Editing lighting or definition is OK.
Don't take video
Identifiers rarely have time to watch a video, which is also likely to be blurry and vague.
Don't bother with senescent mushrooms
Once a mushroom has matured, it becomes difficult to identify. For certain taxa like Suillus, you'll need a younger specimen for a confident id.
Posting Your Observation
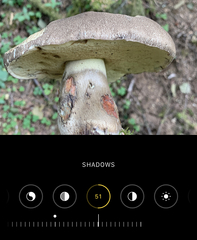
Cover Photo
Post the family portrait first. Crop out anything confusing. For editing, I often apply adjustments to lighting and definition. Specifically, relieving shadows can make the underside more evident.
Posting can be done from the iNat App on your smartphone, but many serious users only use the web interface, even via smartphone. The native iPhone app limits the number of photos and lacks Observation Fields. As a compromise, some use the App in the field, then update their observation with secondary photos and notes later.
Include a provisional ID
Note the suggested ID from Computer Vision. Examine multiple photos, and confirm the taxon is actually attested from your region. Much of CV is based on Eastern US or Euro species that may not apply for your ecoregion. Go ahead and post with this quicky ID for now - you can delete it later.
Optionally, once your spore print is complete, attempt a more rigorous ID. This can involve a dichotomous key, MycoMatch, and browsing a book. Refresh your ID as needed. It may be more clear to delete your original ID than withdraw it.
This mushroom may stand out to you in some particular way. Consider using a mycological glossary to articulate your finding.
Tag an Identifier
Now look up the Top Identifiers for that particular species or genus, and consider tagging them if you have followed all these steps. If you seem to have the first observation, or your shroom appears in a Rare Species list, even consider messaging the expert. You can also email researchers (usually outside iNat) based on the primary literature.
Why reach out? If you come from the birding realm of iNat, you probably expect an expert (perhaps dozens!) to review your entry and offer comments. But at present, this is uncommon for fungi and bland plants. Within several years, someone will confirm a mushroom ID for an unusual, striking species, like (say) the gorgeous Pulveroboletus ravenelii. Otherwise, there are simply too many fungal observations stacking up, relative to identifiers. Experts do want to view high-quality observations like yours though! So reach out!
Save the specimen
You may be asked for your specimen, for DNA barcoding or micrography. This may occur several weeks (or years!) after the observation. As a rule of thumb, consider dehydrating all unusual specimens, then toss them out eventually. If you don't have a fruit dryer, you can put it in a paper bag in your fridge. Consider printing some tags via MycoCode to organize your ersatz fungarium.
DNA barcoding is most easily (and cheaply) done through a large project like Mycota. Several observers extract at home, for more control of the process and capturing more genes. This can be costly in that primers and reagents are less economical in small quantities.
Geotagging
To allay privacy and site concerns, iNaturalist offers an obscuring feature. It would seem effective, but in practice may do little to actually protect a site. Here in western North America for example, most forest regions have only one point of entry. Usually this is an arterial road that follows natural lines of drainage, with capillary spurs. Forested, mountainous trail systems follow a similar pattern. So it's simple to guess the actual location is along a nearby trail and guesstimate an obscured spot by transit lines.
The obscuration is also not intelligent enough to consider oceans, ice fields, or barren alpine as regions typically barren of mushrooms. So if your mushroom was discovered in a snug alpine valley of Mt. St. Elias, the location is still evident by process of elimination.
Bottom line: Don't expect your honey hole of porcini or secret valley to stay unknown once posted! 🕵️
Fresh Names
It's possible iNat has a different species epithet than your literature or lacks the species entirely. If so, just comment your keyed name for now.
If you think the species should be added, flag the genus and include a link to your observation. Review this post before suggesting a name be added.
Microscopy
Microscopy can be daunting but the tools are more affordable these days, and can be applied to insects and plants as well. At present (2023), you can get a passable oil lens Amscope, slide micrometer, and order all the typical reagents for only about $300.
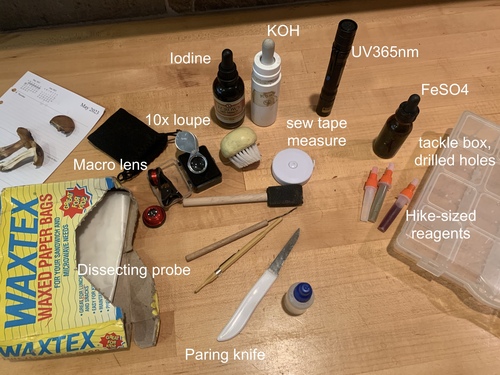
Inventory
All of these items are in the sub-$10 range and easy to find. No need for expensive gear, since you will eventually misplace it in the woods!
- Foam paintbrush
- 10x Loupe
- 365nm UV light
- Small paring knife
- Graduated Transplanting Trowel
- Wax bags
- Clear tackle boxes (drill holes for ventilation)
- KOH in eyedropper bottle
- Recycled Covid test ampoules
- Mini-tripod for smartphone
Take Macro Shots
A macro photo is fun and can often reveal more details. Select something minute on the mushroom, interject your loupe between the smartphone and see what you discover!

